31 March 2013

Speckled Easter Eggs

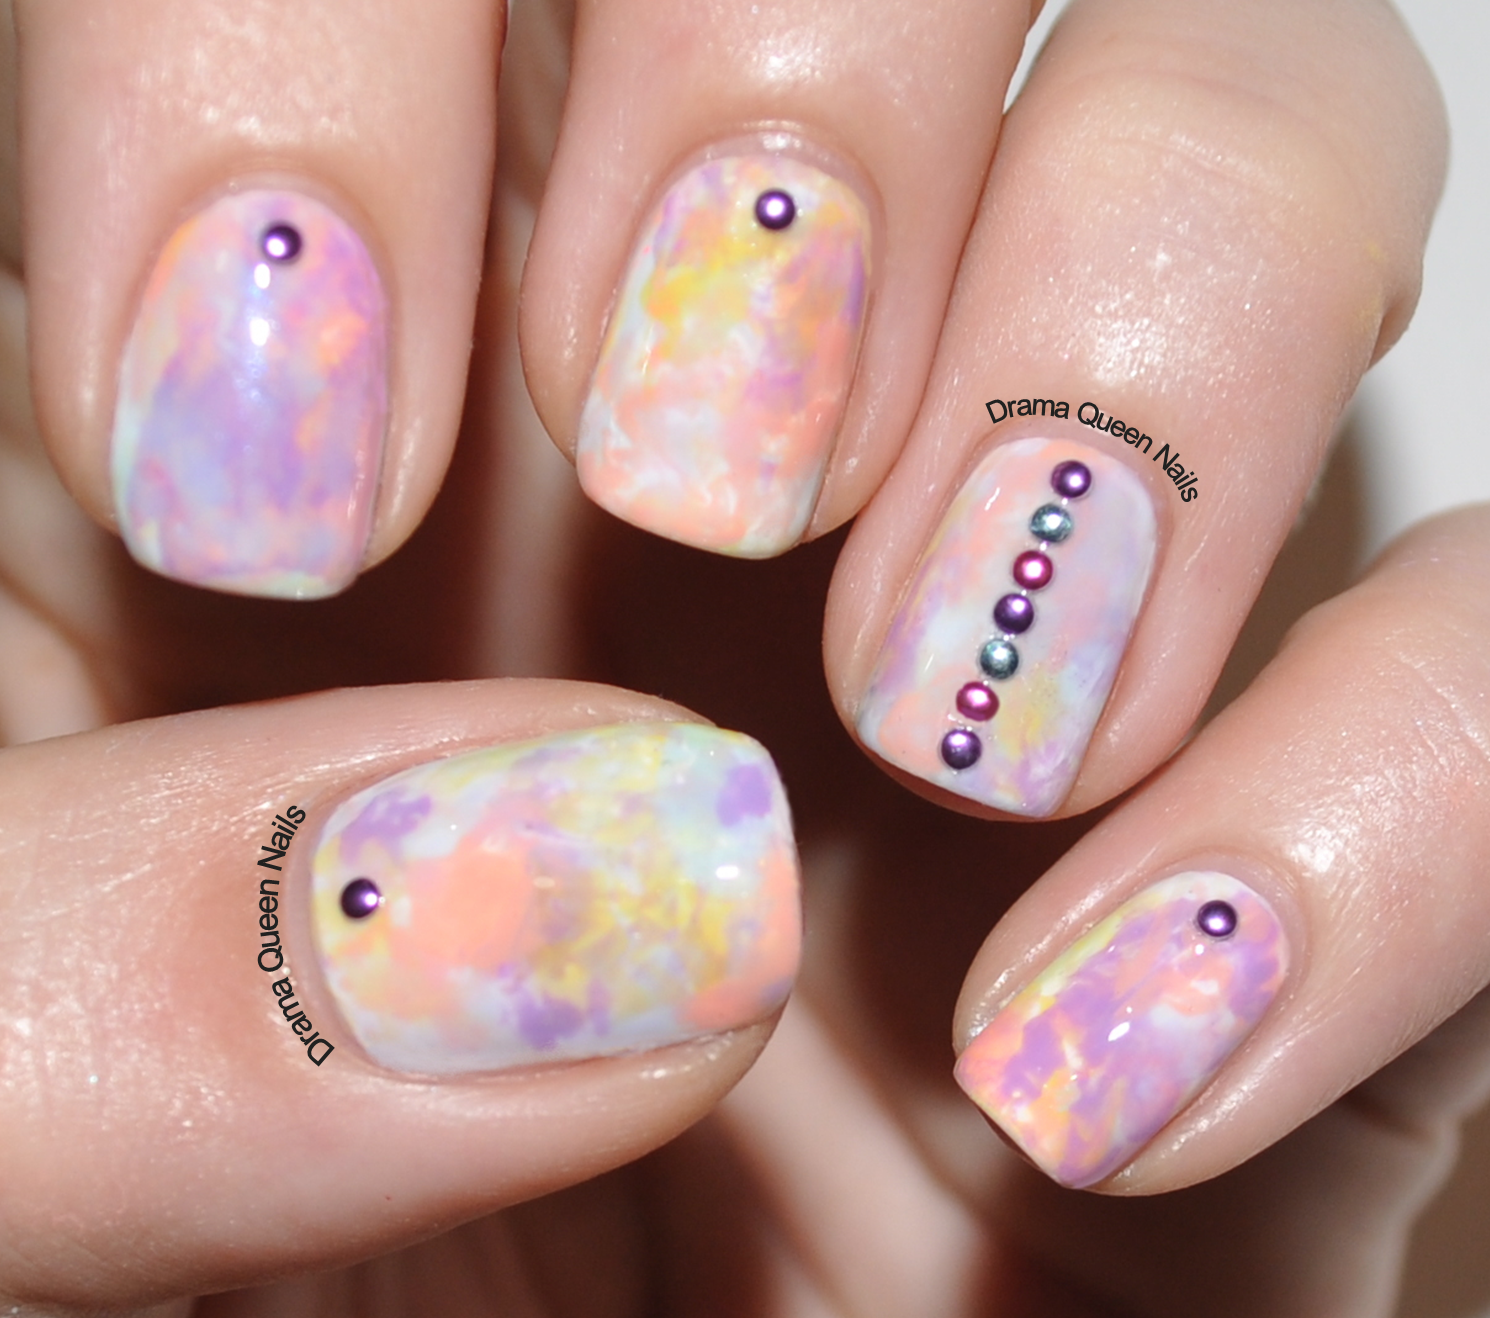
Happy Easter everybunny! I hope you have had a lovely weekend with your family and friends and that the bunny was kind to you all. Now onto the Easter Nails.....candy speckled eggs. Read on for a tutorial.


After trolling through a bazillion IG Easter nails pics over the last few days I was ready to get my bunny on. I had it all planned out to do a kitchen sink mani with bunnies, eggs and of course some polka dots with a glitter accent. But I think I must have used up all my bunny powers yesterday at the markets....I see you cute little bun bun, hop, hop, hop!


I must have spent 3 hours last night messing around with combos trying to recreate the mani I did yesterday but nothing looked right. In the end I gave up and watched a tonne of Game of Thrones episodes instead. After a fresh cup of coffee the next day it came to me as I reminisced about my childhood.  Every year the bunny used to bring these hard candy eggs with little yellow and purple candy hearts inside of them, a pastel pink egg for me and a pastel blue one for my brother. Its a miracle we never chipped a tooth on those things, they were like rocks.....delicious rocks!


For this mani I used the Glad Wrap or Saran wrap technique. It dilutes the polish to create subtle colours like a water painting or a beautiful piece of marble.  Its really easy, albeit a little messy, but I highly recommend giving it a try as it gives such a pretty end result. 

The polishes I used in this mani:

Barry M - White
Barry M - Blue Moon
Barry M - Strawberry Icecream
Barry M - Lemon Icecream
Zoya - Miley
Essie - Playdate


So now on to the tutorial. I did this a little while ago with different colours but the technique behind it is the same, just with more colours.


Step 1: Apply one layer of a base colour. If you are using just 2 colours, apply a coat of the light one. For my Easter mani as I was using 5 pastels I did a white polish base.


Step 2: Dribble blobs of polish onto the Glad wrap but make sure they are touching.


Step 3:  Fold the Glad Wrap over on itself and mush all the polish together by tapping lightly on top of the Glad Wrap.


Step 4: Unfold the Glad Wrap to open it up, then dunk your nail over a spot where the polish has marbled nicely together. If you have any bare spots on your nail dunk it again. 


Step 5: You will get polish on your skin, so apply sticky tape to cover your skin to limit clean up, or skip it and use a cotton bud and remover to clean up. Because the polish is diluted a bit clean up isn't too bad. 

This was the finished product when I used just 2 colours. 


Would love to see pics if you give this technique a go. Tag me on Instagram  @dramaqueennails

Happy Easter!


25 March 2013

Aussie Nails Monday - Blue

Just a quick one today. Blue nails for Aussie Nails Monday. If you are just getting into DIY nail art joining in on group challenges is a great way to do designs or use colours that you normally wouldn't use. It pushes you out of your comfort zone which is a good way to stretch yourself. Read on for the polishes and plates I used.


China Glaze - Water You Waiting For (blue glitter)
OPI - Samoan Sand (nude)
Kleancolors - Metallic Aqua
Blue Ripple - We have 10 colour packs of the ripples available from the markets. They will be up in the online shop very soon for those who aren't local.

Water You Waiting For is such a gorgeous glitter. It applies smoothly without bald patches. This is two coats with topcoat. 


I stamped using plate W111 from the Winstonia Stamping Collection. We have a few sets available if you like this design. The rest of the images in the collection are equally awesome.  Ill hopefully get them all photographed soon so you can see the entire collection. The originality and quality of the plates deserves a big thumbs up.

24 March 2013

Matchy matchy leopard print

Love it or hate it leopard print never seems to go out of style. You can keep it close to the original using beige, orange, white and black or mix it up to create something a little more colourful and fun. I bought a really fun ghetto fab watch on Friday and as I was sitting at the markets on Saturday I decided to recreate the pattern on my nails.


Leopard print is super easy to create and it doesn't matter if its a bit messy and irregular. It's a great design to start experimenting with if you are new to DIY nail art.


  1. Paint a white base.
  2. Use a small dotting tool to add coloured dots or jelly bean shapes all over the nail spreading your colours around.
  3. Use the same dotting tool to add black "C" shapes around the coloured dots. Mix it up, turn the c shapes around and don't put them all in the same direction.
  4. If you have any spots left add a few random black sqiggles or black dots.
  5. Wait a good 5-10 min before applying topcoat so that you don't smudge the black.


The colours I used:

  • Barry M - White
  • China Glaze - Towel Boy Toy (blue)
  • Barry M Gelly - Pink Flamingo (pink)
  • Zoya - Pippa (yellow)
  • Essie - Brooch the Subject (beige)
  • Barry M - Black


18 March 2013

Gloss 'n Sparkle - Fruit Tingle

If you look back through my past manis you"ll be able to quickly determine that I seem to gravitate towards pinks, purples and blues as a popular colour combo. I have a whole draw devoted to those colours in my Ikea Helmer and its bursting at the seams. So this indie glitter from Gloss ' n Sparkle was meant for me as it combines all those colours, and the icing on the cake, black sparkles. Read on for a review of Fruit Tingle.


The base of this polish is a creme with a range of glitter shapes and sizes. There is pink and light blue micro dots, blue and black hexagons and then a scattering of bigger black hexagons. The glitter applied pretty evenly through normal brush strokes, no dabbing required. But it did clump together leaving some areas with more glitter than others. You know I love, love, love my G'nS polishes but the formula of this particular one could do with some refining. The creme base is a little thick and the finish is pretty lumpy. It did smooth down with top coat but it just wasn't as perfect as Topsy Turvy or Unicorn Droppings. Still, the finished colour is a rich pink purple with a devine sparkle. 

At the time of this post Fruit Tingle appeared to be sold out so check back for a re-stock soon.

17 March 2013

Reverse Gradient for #bestietwinnails

So I decided to jump on the #bestietwinnails bandwagon. This tag is currently doing the rounds on Instagram and I think its a fab idea. Get together with your bestie and have matching manis. I'm lucky enough to run DQN with my bestie and she is always kind enough to let me experiment and try out new techniques on her....the reverse gradient.

Read on for a tutorial for how to do this design.


Julsie's pink reverse gradient.


My St Paddy's Day version.

Now on to the tutorial. Here is what you will need to complete this design.


  • Base and Top coat
  • white nail polish - Barry M White
  • 3 colours from the same hue family. I chose OPI - Skull and Glossbones, Zoya - Bevan and Barry M Gelly - Watermelon
  • Striping tape and scissors
  • A makeup sponge, or other sponge but I find this kind of sponge is easy to hold and the perfect size and shape for using on nails.

Step 1: Prep your nails with one coat of white polish. This helps to make the colours vibrant and if you are using a sheer polish is vital for ensuring your mani isn't see through. It doesn't need to be perfect, its about to be covered in 4 layers of polish. 

HANDY HINT: Leave a bigger than normal gap between your polish and cuticle. When you are cleaning up you will need to use a small brush to wipe away polish near your cuticle. You don't want the white polish to start showing through, leaving a big gap makes this a lot easier to achieve.


Step 2: Paint 3 layers of your chosen colours onto the sponge. Make the first few strokes really heavy on with the polish to get the sponge primed. Overlap each layer to the colour above and below it to blend the colours. You could use this technique also for a much cleaner blend but it will take a really long time to get through this design. Because there is so many layers to this mani, painting it onto the sponge may give you a "liney" look, but when it's finished there is so much going on that you cant really notice it.


Step 3: Dab the sponge onto paper to remove excess polish before applying to the nail. Apply to the nail dabbing in one direction, from the tip towards the cuticle.


Step 4: Messy! You could apply sticky tape on your skin around the nail to avoid this mess and make clean up easier but I feel awkward with tape on me and its hard to handle the striping tape in the next step. Make sure you cannot see any of the white base you applied, get the sponge down into the nooks and crannies. IMPORTANT: Add a layer of quick dry topcoat now. If you don't do this the striping tape will mess up your design. Wait a good 10 minutes before moving on.


Step 5: Cut up your striping tape. You will need 17 pieces for each hand. Manipulate your striping tape with tweezers, it makes it so much easier than trying to use your fingers.


Step 6: Apply 3 pieces of tape to each nail, spaced evenly apart. Use 5 pieces for your thumb.


Step 7: Repeat step 2 except reverse the order of the colours on your sponge. Repeat step 3. HANDY HINT: After sponging the polish onto the nail remove the striping tape before moving on to the next finger. Removing tape whilst the polish is still wet will give you cleaner lines. I didn't do it here because I wanted to show you what this step looks like in full.


Step 8: Remove all the striping tape and get ready to clean up. I started clean up with cotton buds to remove the bulk of the polish on my skin. Then I moved to using my clean up brush. Apply topcoat again and you are done.


13 March 2013

Gloss 'n Sparkle Topsy Turvy

One of the many bonuses of indie glitter polishes is that wearing them alone is fancy enough. Sometimes I am just not in the mood to make a ginormous mess and attempt nail art this late in the day. Why cover this gorgeous polish with anything? Its stunning on its own. Gloss 'n Sparkle Topsy Turvy.


Topsy Turvy is a mixture of black hexagons in 2 sizes, green and black micro dots, and smaller purple hexagons suspended in a milky jade base. This is 2 coats with topcoat. The jade green is luscious and applied like a dream. The glitter spread out perfectly without the need for dabbing to spread out the glitter evenly. It was really hard to capture the purple glitter as it appears blue with the jade background, however it is definitely purple.

 I am in love with this polish but then again I haven't met a Glass 'n Sparkle polish that I didn't love. If you like this polish head over to Angela's Etsy store and snap it up before its gone forever.

10 March 2013

Black diamonds and BYS Glitterdust

When you cant afford real black diamonds the next best thing is wearing them on your nails. Today's mani is a mix of BYS Glitter Dust and some stamping with rhinestones. Read on for a review.


BYS Glitter Dust came in a pre packaged set. In the set there was a black nail polish, the tub of glitter and a little brush for clean up.  There is a whole range of colours in the series which you can find more about here. The concept is a 3 step process, paint, dip, brush......sparkle! This is one layer of glitter with 2 layers of topcoat. It had more silver in it when it didn't have top coat on but it was kinda brushing off here and there without it so for wear I added the topcoat. The finished look is textured, liquid sand like and very similar to Pixie Dust by Zoya or the Mariah Carey collection by OPI.


The glitter is very fine with mostly black micro dots, and silver holographic particles. These shots were taken in direct sunlight.  They are still very sparkly in indirect sunlight or indoors. Application was a little messy. There was lots of excess glitter that needed to be brushed off which made clean up near the cuticle a little tricky. And now my desk is covered in a fine sprinkling of bling. I think next time I would be better prepared and put paper underneath me to make clean up a little easier.


I will definitely by buying a few more of these glitters. For the price they give excellent results and the black polish I got in the set is opaque in one coat and works well for stamping.


8 March 2013

Picture Polish Attitude for IWD

So today is International Women's Day. A day to celebrate all things girly, including our past successes in fighting for equality to our future hopes and dreams. So put on your bright pink lipstick, pour yourself into your favourite LBD, buckle up those gorgeous, strappy sandals and most importantly rock something fabulous on your nails....show a little attitude, now work!


Picture Polish - Attitude is a midnight purple, scattered holographic glitter creme polish. This is two coats with topcoat in direct sunlight. Its magical, and so so chic, perfect for Autumn with its muted blue undertones. The formula was perfection, seamless in two coats with no bald spots. It dried quickly and smoothly as the glitter is embedded in the base, rather than floating on top.


6 March 2013

Zoya Gilty

Gold flake topcoat.....Stylish or ghetto fab? Im not normally a gold type of person. All my jewellery is silver or white gold but every now and then I think its fun to strap on your ghetto gold Carrie necklace and embrace something a little out of your comfort zone.


Zoya Gilty is an 18K real gold flake topcoat. The flakes are suspended in a clear suspension base. It is not fast drying, however is suitable to use as a final layer over any mani. I did apply a layer of Seche over mine to dry it quickly. The bottle contains a range of gold flakes from bigger nugget like chunks to smaller flake particles. Its like shredded gold in a bottle and might I say, very pretty shredded gold. It was a little difficult to create a glitter gradient with as it got a bit suspension base heavy when trying to build up the final layer near the cuticle, but its still really gorgeous. The formula when painting full nails was good, the flakes mostly spread evenly with only a few dabs needed here and there to fill a couple of empty spots.


Zoya Gilty is available in a limited edition 3 polish set. You get Zoya Raven and Zoya Purity as well as Gilty all stored in a luxury black velvet lined box....fancy! All Zoya products are cruelty free. In stock now. The black is China Glaze Liquid Leather and the nude is Essie Sand Tropez.


1 March 2013

I can see your doodle

Doodle Nails! These turned out completely random as most doodles normally do, but I love, love, love them. Worth the hour it took to do 2 nails. I used a plain black nail art pen that I bought from a chemist ages ago. I had to go over the lines about 3 times each to neaten them up and make them super black hence why they took so long, but they are uber cool. There are no real tricks to this besides having a steady hand and a tonne of patience. 


  • Barry M Gelly - Prickly Pear (lilac)
  • China Glaze - White on White
  • China Glaze - Novo (glitter)
  • Black nail art pen.


LinkWithin

Related Posts Plugin for WordPress, Blogger...